When it comes to upgrading your kitchen, you don’t always need an expensive remodel. With a few basic tools, some plywood, and the right hardware, you can build a simple kitchen cabinet design that looks clean, functions well, and fits perfectly into your space. This DIY approach saves money and gives you the satisfaction of creating something with your own hands.
Choosing a simple kitchen cabinet design will substantially improve your kitchen’s overall functionality. This option ensures that the workstation is both practical and efficient. A well-designed simple kitchen cabinet design may truly enhance your culinary experience.
Investing in a simple kitchen cabinet design might add tremendous value to your property. Ultimately, such a design reflects your personal preferences and needs. Personalizing a minimalist kitchen cabinet design can certainly make it stand out.
Explore contemporary trends in simple kitchen cabinet design that match your personal taste. With a minimalist design, you may achieve the ideal combination of functionality and flair in your kitchen.
Consider different layouts for your simple kitchen cabinet design to make the best use of your space. A minimalist kitchen cabinet design is the key to realizing your kitchen’s full potential. The functionality that such a design provides for any kitchen is unrivaled.
For a long-lasting design, use high-quality materials for your . The key to a great simple kitchen cabinet design is cautious material selection
Using a simple cabinet design will make your kitchen appear more spacious. This design allows you to express your individual flair. For a modern look, use a minimalist kitchen cabinet design with smooth materials. Many people prefer minimalist kitchen cabinet designs because they are adaptable.
Many homeowners like a simple kitchen cabinet design because of its simple building method. A simple design lets you maximize storage while maintaining flair. Consider the benefits of a simple kitchen cabinet design that suits your lifestyle.
Why Choose a Simple Kitchen Cabinet Design?
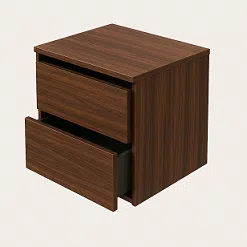
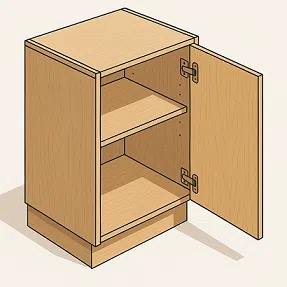
A simple kitchen cabinet design is all about functionality and efficiency. Instead of complicated joinery or exotic finishes, this style focuses on straight cuts, practical storage, and easy assembly. The clean lines fit into almost any kitchen style—from modern minimalism to cozy farmhouse. Best of all, the design is flexible: you can start with a single-door cabinet and expand into multiple units for a complete kitchen layout.
Tools You’ll Need
Building your own cabinet doesn’t require a fully equipped workshop. Here are the essentials for this project:
- Circular saw or table saw for cutting plywood
- Drill/driver with bits and screws
- Pocket-hole jig or confirmat screws for strong joints
- 35 mm Forstner bit for hinge cups
- Measuring tape, square, and clamps
- Sander with 120/180 grit paper
- Optional: iron and trimming tool for edge banding
Tools
- Cutting can be done using either a table saw or a circular saw, along with a straightedge or track for guidance.
- Drilling/Driving: Drill/driver, 2 mm (5/64″) and 3 mm (⅛”) bits, countersink
- Hinges: 35 mm Ravinte bit (for hinge cups)
- Joinery (pick one):
- Use a pocket-hole jig with 32 mm (1¼”) pocket screws, or
- Confirmat screws, or
- Dowels/biscuits + glue (more clamps needed)
- Measuring & Assembly: Tape, square, clamps (right-angle if you have them), level
- Finishing: Iron (for edge banding), trimming tool/knife, sander, 120/180 grit
- Safety: Eye/ear protection, dust mask
These basic tools are enough to take you from raw sheet material to a finished cabinet ready for installation.
Kitchen Cabinet—Complete How-To
Finished size (example)
- Width: 600 mm (24″)
- Depth: 560 mm (22″) carcass to sit under a 600 mm (24″) countertop
- Height: 720 mm (28⅜”) box + 100 mm (4″) toe-kick = 820 mm (32¼”) overall
Materials (for one 600 mm / 24″ cabinet)
- Sheet goods
- 18 mm (¾”) plywood or melamine: One full sheet, measuring 2440×1220 mm (or 96×48 inches), is sufficient.
- 6 mm (¼”) plywood or hardboard for the back
- Optional: edge banding (PVC or wood) for front edges
- Hardware
- (2) 35 mm concealed hinges (Euro hinges) + plates (full overlay)
- (4) Shelf pins, also known as pin strips, are intended for one adjustable shelf.
- #8 × 38 mm (1½”) screws for carcass, #6 × 16 mm (⅝”) screws for back & hinges
- Cabinet handle/pull and screws
- Use leveling feet or scrap plywood to construct a toe-kick platform.
- Optional: magnetic catch or soft-close bumpers
- Finishes (optional)
- Use primer, paint or clear coat (polyurethane), and wood filler.
- Construction adhesive/wood glue
Cut List (18 mm / ¾”)
(Adjust widths if you change the cabinet width.)
| Part | Qty | Metric (mm) | Imperial (in) | Notes |
|---|---|---|---|---|
| Sides | 2 | 720 × 560 | 28⅜ × 22 | Grain vertical |
| Top & Bottom (between sides) | 2 | 564 × 560 | 22¼ × 22 | 600 − (2×18) = 564 |
| Shelf (inside) | 1 | 564 × 522 | 22¼ × 20½ | Shorter depth for door/hinge clearance |
| Back (fits inside) | 1 | 564 × 704 | 22¼ × 27¾ | Height = 720 − (2×18) |
| Door (full-overlay) | 1 | 596 × 716 | 23½ × 28¼ | Leave ~2 mm (1/16″) gaps all around |
| Toe-kick platform | 1 | 600 × 520 × 100H | 24 × 20½ × 4H | Box or 4 feet/levelers |
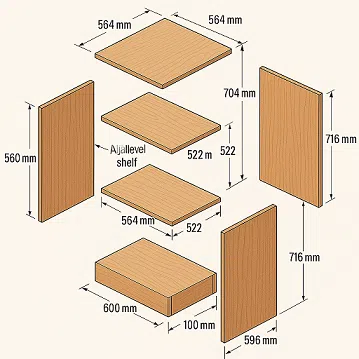
Tip: Edge-band the front edges of the sides, shelf, top, and bottom before assembly (especially with melamine).
Build Steps (friendly but thorough)
1) Prep & Breakdown
- Mark clean, square cuts. If using a circular saw, clamp a straightedge; support the sheet fully.
- Cut parts to the cut list. Label each piece immediately.
- Apply edge banding to all front edges. Iron it on, roll it down, let it cool, then trim it flush and sand it lightly.
2) Toe-kick / Leveling Base
- Make a simple toe-kick box 600×520 mm (24×20½”) and 100 mm (4″) high. Please assemble it and ensure it is square and level.
Alternative: install adjustable leveling feet under the cabinet. - Set aside for installation day.
3) Carcass Joinery (choose a method)
All methods are effective—please choose the one you feel most comfortable with
- Pocket screws: Drill pocket holes on the inside faces of top & bottom pieces (front and back edges). Glue and screw into the side panels.
- Confirmat screws: Pre-drill special pilot holes and drive confirmats through sides into top & bottom.
- Biscuits/dowels: Glue, clamp square, and add the back once cured.
I’ll describe pocket-hole assembly below because it’s quick and sturdy.
4) Assemble the Box
- Lay one side panel flat, inside face up. Position the bottom piece flush with the bottom and front edges; add glue at the joint. Clamp and drive pocket screws.
- Repeat for the top piece on the same side panel.
- Please stand the sub-assembly upright, position the second side, and proceed to glue, clamp, and screw.
- Check square by measuring diagonals (they should match). Adjust clamps if needed.
5) Install the Back
- Dry-fit the back (564×704 mm / 22¼×27¾”). It should sit flush to the back edges.
- If the box is square, glue the perimeter and pin or screw the back every 100–150 mm (4–6″).
- Re-check square—the back locks it in.
6) Shelf Supports
- Easiest: drill four 5 mm (3/16″) holes (two per side) at your preferred height; insert shelf pins.
- Nicer: use a shelf-pin jig to create a short column of holes (the 32 mm system).
- Place the shelf 20–40 mm (¾–1½”) back from the front edge for hinge and finger clearance.
7) Door & Hinges (Euro, full overlay)
- Mark the hinge cup centers from the door edge:
- Cup center typically 22–23 mm (⅞”) from the door edge.
- Set the bore depth so the 35 mm cup sits flush (usually ~12–13 mm deep).
- Always verify with your hinge’s template (brands vary slightly).
- Drill two 35 mm cup holes, usually 100–120 mm (4–5″) from the top/bottom.
- Screw the hinge cups to the door.
- Clip/attach the hinge plates to the inside faces of the cabinet sides. Start with plate holes roughly centered in their slots.
- Hang the door. Adjust in/out, up/down, and side-to-side using the hinge screws until the reveal is even (~2 mm / 1⁄16″).
- Add the handle. Common placement: 60–80 mm (2⅜–3⅛”) from the free edge, centered vertically for base doors (or aligned with other cabinets).
8) Install the Cabinet
- Set the toe-kick/levelers in position and shim/level them.
- Place the cabinet on the base. Check plumb and level front-to-back and side-to-side.
- If wall-mounting to studs, add an internal mounting rail/cleat (a strip at the upper back inside) and screw through it into studs. For a run of cabinets, clamp faces flush and screw boxes together through the front edges.
- Fit fillers/scribes if your wall isn’t perfectly straight.
9) Finish
- Fill visible screw holes (if any) and sand to 180 grit.
- Paint or clear coat. Two light coats, sand lightly between.
- Stick bumpers inside the door corners. Drop the shelf on its pins. Done!
Helpful Notes & Options
- Widths other than 600 mm: Keep the sides, depth, and height the same; change only the top/bottom/shelf widths to:
Cabinet width − (2 × panel thickness)→ e.g., for 500 mm wide: 500 − (2×18) = 464 mm. - Two doors: Make two doors each ~½ the opening with 2 mm gaps at the center. Add a second pair of hinges.
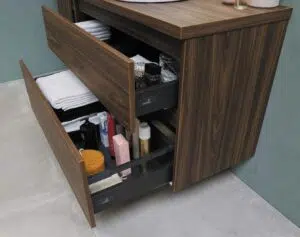
- Drawers instead of a shelf: Use standard drawer slides (450–500 mm length), and build drawer boxes to fit the internal width (opening width minus slide clearances, typically 25 mm total for side-mount slides).
- Back in a groove: You can rabbet/dado the sides/top/bottom so the back insets; this looks cleaner and helps square the box but requires extra machining.
Quick Shopping Checklist
- 18 mm plywood/melamine (1 sheet)
- 6 mm backer (¼ sheet)
- Edge banding (optional)
- (2) 35 mm hinges + plates (full overlay, soft-close if you like)
- Shelf pins (4)
- Screws (#8 × 38 mm, #6 × 16 mm)
- Handle/pull + bolts
- Leveling feet or toe-kick scraps
- Finish (primer/paint or clear), wood filler, sandpaper
Summary. Step-by-Step Construction
- Cut and Prepare Panels
Break down the sheet goods according to the cut list. Label each piece as you go and apply edge banding to all front edges if using melamine. - Build the Toe-Kick
Create a simple 100 mm (4”) high toe-kick box or attach leveling feet to the base of the cabinet. This raises the cabinet to an ergonomic working height. - Assemble the Carcass
Join the top and bottom panels between the two side panels. Pocket screws, confirmat screws, or dowels all work well. Make sure everything is square. - Attach the Back
Fit the thin back panel into place. Secure it with glue and small screws or nails. The back locks the box square and adds strength. - Install the Shelf Supports
Drill holes for shelf pins and drop the shelf in at your preferred height. Adjustable shelves make this simple kitchen cabinet design versatile. - Fit the Door
Drill 35 mm hinge cup holes in the door and attach the concealed hinges. Mount the door to the carcass, adjusting for an even 2 mm gap all around. - Finishing Touches
Attach the handle or pull, sand the edges smooth, and apply paint or a clear finish. Add soft-close bumpers or catches if desired.
Why This Design Works
Many experienced designers recommend a simple kitchen cabinet design for small rooms. Creating such a design can inspire creativity in your cooking. A basic design makes it simple to find everything you need in the kitchen.
Using a simple kitchen cabinet design can create a more pleasant cooking atmosphere. Including such a design in your kitchen promotes better organization. A minimalist kitchen cabinet design can be customized to suit your individual requirements. Choosing this design helps to maintain a neat aesthetic.
The beauty of this simple kitchen cabinet design lies in its adaptability. You can build a single cabinet for extra storage or repeat the process to create a full run of base units. By keeping the construction straightforward—square cuts, minimal joinery, and easily available hardware—you get professional-looking results without overcomplicating the build.
Cabinet Design Ideas. More to come.